How To Take Sharp Photos: Camera Settings, Focus Points and More
- Apr 15, 2018
- 7 min read
Updated: Sep 27, 2020
Creating consistently sharp, well focused images can be tough! There are a lot of variables to keep in mind on top of posing and engaging your subject. Let's go over some of the general rules and tips for creating sharp photos.

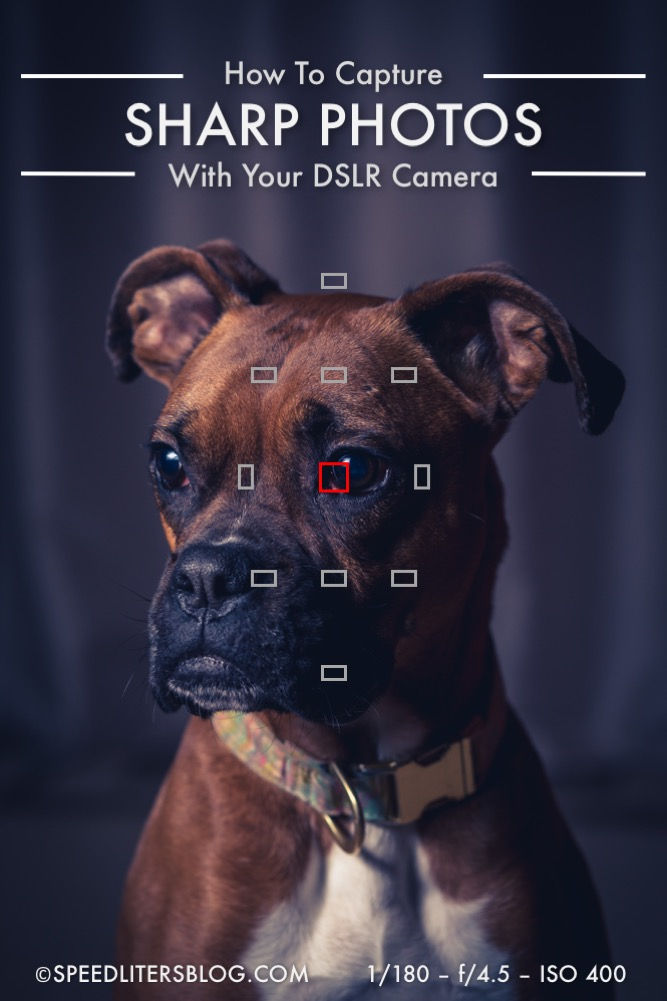
SETTINGS: 1/180 sec at f 4.5, ISO 400
GEAR: Canon 6D, Canon 85mm1.8, Canon 600EX-RT triggered by long sync cord, Westcott Apollo Medium 28" gridded
Before I continue, I want you to know that Speedliter's Blog is an Amazon Affiliate. This means that, at no cost to you, I may earn a commission from items you purchase from Amazon using the links in this blog. This actually applies to anything you purchase within 24 hours, so if there's a different or more affordable alternative that gets you up and shooting faster, get it! Thanks for using our links and supporting Speedliter's Blog!
1 GEAR: CAMERA, LENSES, TRIPOD
CAMERA: You can create sharp photos with many types of digital single lens reflex (DSLR) and digital cameras. The trick is using the right settings and understanding what settings produce the results you want. Admittedly, it is going to be easier to create sharp images if you have better equipment. Newer DSLR cameras will have better image stabilization and noise reduction.
LENS: If possible, get a lens with built in image stabilization. Each lens company calls image stabilization something different. I listed a few of them below. Newer lenses will have better glass and image stabilization. I don't recommend using filters on your lens unless you absolutely need to (perhaps an outdoor neutral density filter situation). Filters just add another piece of glass between your camera and your subject. If you're worried about your glass, get a lens hood to protect it.
Terms for technology that reduces lens/camera shake:
Canon - Image Stabilization (IS)
Nikon - Vibration Reduction (VR)
Sigma - Optical Stabilization (OS)
Tamron - Vibration Compensation (VC)
When I was starting out, I purchased prime lenses (or rather "a prime lens"). They are lightweight and more affordable than zoom lenses and in most cases they are just as sharp if not sharper. My first purchase was the Canon 50mm 1.8 (later upgraded to Canon 50mm 1.4), then Canon 28mm 1.8, then Canon 85mm 1.8. If I were doing it all again and had all the money up front, I may have gotten the Canon 24-105 F4, but it's debatable. Do what's right for you. If you are going to shoot candids of running kids, I recommend a zoom lens like the Canon 24-105 F4. If you want lightweight and don't have hundreds to shell out on a nice zoom, go with primes. You can still use your feet to zoom by moving closer or farther from your subject.
Don't let any of the above paragraphs stop you from using or purchasing a DSLR or lens that is within your budget. At the end of the day, your technique is what will impact sharpness of photos the most! You don't need a fancy camera to take sharp photos. Get a camera you can afford and start shooting!
TRIPOD: When possible, use a tripod! For some types of photography, like landscape or product photography, a tripod is a must! It is also great to use if you're shooting portraits or head shots if you don't need to move around. I don't do a lot of landscape photography, so I find that something affordable like this Dolica Proline Tripod works great. If I did use a tripod more frequently, I would probably get something a little nicer like this Manfrotto Tripod.
2 SHUTTER SPEED
Unless you're trying to blur part of your photo to convey a feeling of movement, faster is better. A generally accepted photography rule is to match your shutter speed to your focal length. This means that if you're using a 50mm lens, you should select shutter speed faster than 1/50 of a second. If you're using a 70mm lens, you should select a shutter speed of 1/70 of a second or faster. However, faster is still better. For example, studio photographers like Joel Grimes are going to favor a speed around 1/250 or faster to capture crisp portraits. A photographer like Jeff Cable is going to use shutter speeds upwards of 1/1000 when shooting the olympics to make sure he captures a fast moving skier or luge. Faster is better and you must take into consideration what you are shooting.
3 APERTURE
While a wider aperture (smaller number) is better for letting in light and creating beautiful bokeh (blur behind your subject), a smaller aperture will keep more of your subject in focus. If I'm shooting a moving child, I'm not going to open my aperture wider than 2.8. I'm even more likely to keep it closer to 5.6. Depending on the movement of my subject, I'll use 2.8 to 5.6 for a single subject. For a group I'll use 5.6 to 11.
If you buy good lenses, they will be fairly sharp at all apertures. However, even the best lenses have a "sweet spot" where they are sharpest. The sweet spot is generally going to be between 7-11. If you want a sharp image regardless of aperture, you may want to use an aperture in this range. If you want to learn more about the qualities of your specific lens, check out the Lens Quality tool at The-Digital-Picture.com. They have taken test shots with TONS of lenses and you can analyze each lens at different apertures and distances. This is a great place to compare lens sharpness before purchasing a lens. If this seems like a lot of information, don't worry about it right now. Just skip to the next paragraph. At the end of the day, the most important thing is that you get out there and take photos even if it's just on your phone.
This is one of my favorite photos! But it is a good example of what happens when you don't "stop down" your aperture (use a higher number aperture) to get all subjects in focus. While still a great photo, it could have been cool if Willow was in focus in addition to Remington. Perhaps f/11 would have been better. Hindsight is 20/20!

SETTINGS: 1/180 sec at f 5.6, ISO 400
GEAR: Canon 6D, Canon 28mm 1.8, Canon 600EX-RT (2), Yongnuo YN-E3-RT
4 ISO
Lower is usually better when it comes to ISO. The higher the ISO, the more noise will appear in your image. Noise makes your photos look grainy. If you ever looked at a photo and noticed it is grainy or sandy looking, that's noise (see example below). Noise isn't always bad. Sometimes I add noise to photos to portray a vintage or lifestyle feel. If you can't get the shot without it, get creative with it! However,in most cases it's best to keep noise as low as possible by using an ISO as close to 100 as possible. I am spoiled a bit by my Canon 6D DSLR because it will allow me to get up to around 2000 without so much noise that it would ruin an 8x10 print. This is my opinion; Some photographers are much more particular. If you do see a lot of noise in an image, you can always increase the Noise Reduction Luminance slider (see below) in Adobe Lightroom. Lightroom does an excellent job reducing noise. The Noise Reduction tool also smooths skin a little. If you don't have time to smooth skin manually, it's a fast, easy way to improve skin smoothness a little.

5 FOCUS
When photographing people, always focus on the eyes. Click the focus point selection button and then use the dial by the shutter button or the arrows by the LCD panel to select a focus point on your subject's nearest eye. Ideally, you should select a focus point that is on your subject's eye with the shot already composed (everything in the frame where you want it in the final image). However, if your camera does not have enough focus points to allow for this, move one of the focus points to the eye to focus and then recompose after focusing. For example, imagine your camera only has one focus point in the middle of the view finder. You're supposed to focus on the eyes, but you don't want the eyes in the middle of every image. When you press down the shutter button half way to focus, make sure it's on the closest eye. After focusing, keep the shutter button pressed halfway down and move your camera back to where you want it (eye not in the middle). Recomposing like this is not ideal, but sometimes it is the only option when using autofocus. If you're having trouble with focus points because of low light, you may have to use the center focus point and then recompose. The center focus point is usually the most reliable focus point.

SETTINGS: 1/200 sec at f/2.8, ISO 2000
GEAR: Canon 6D, Sigma 70-200 2.8
6 POSING
When possible, arrange your subjects so that they are on the same focal plane; Arrange them so that they are all the same distance from the camera. When shooting a family of four, try to keep faces (eyes) all the same distance from the camera. When shooting a larger group you may think, "I just need to keep everyone in a line." But this is not true. If everyone is in a line, the people on the ends are actually farther from the camera. When arranging a large group, curve the line slightly so that people on the ends are forward a little so that they are the same distance from the camera as people in the middle.

7 AI SERVO FOR MOVING SUBJECTS
If you are shooting moving subjects, like sports or active kids, the distance between the subject and your camera may change during the time it takes you to focus and shoot. If you know your subject will be moving, use AI Servo instead of One-Shot focus. Unlike One-Shot focus, AI Servo tracks your moving subject and estimates the focus for you. You still need to have your focus point on your subject, but it will help adjust for the subject's movement. The is another option, AI Focus, that is supposed to switch between One-Shot and AI Servo for you, but I do not find that it works well consistently so I don't recommend using it.
8 CLEAN
Clean you gear! Make sure to keep your lens and camera sensor clean. Keep a microfiber cloth on you at all times to clean dust from your lens. If your lens is clean and you still notice debris or smudges in your images, maybe it's time to clean your sensor. If you're not comfortable doing this, take your camera to a local store or contact the manufacturer for help.
I hope this article helps you create sharp images. If you have questions or suggestions, I'm happy to address them in the comments below. If you liked this article, please share it! When it's time to buy new photography gear, I appreciate you using the links from Speedliter's Blog. At no cost to you, Speedliter's Blog may receive a small commission. This applies to anything you purchase within 24 hours of clicking the link. So if you find something different or more affordable that woks for you, get it! The most important thing is that you get out there and keep shooting!


Hi. Greetings from Singapore. And thank you for your photography tips which is much appreciated.
I wish to enquire whether you have courses or eBooks on the 3 Exposure Modes i.e. Aperture, Shutter Speed & Manual Mode using AUTO ISO please?
Appreciate your response please.